
5. Getting started
5.1. Overview
In this chapter we walk through one of the example applications (RandomNumber) which are distributed with the framework. We look briefly at the different files and go over the steps needed to compile and execute the code. We also outline where various subjects are covered in more detail in the remainder of the document. Finally we cover briefly the other example applications which are distributed and say a few words on what each one is intended to demonstrate.
5.2. Creating a job
Traditionally, a “job” is the running of a program on a specified set of input data to produce a set of output data, usually in batch.
For the example applications supplied this is essentially a two step process. First the executable must be produced, and secondly the necessary environment variables must be set and the required job options specified, as illustrated in Fig. 5.1.
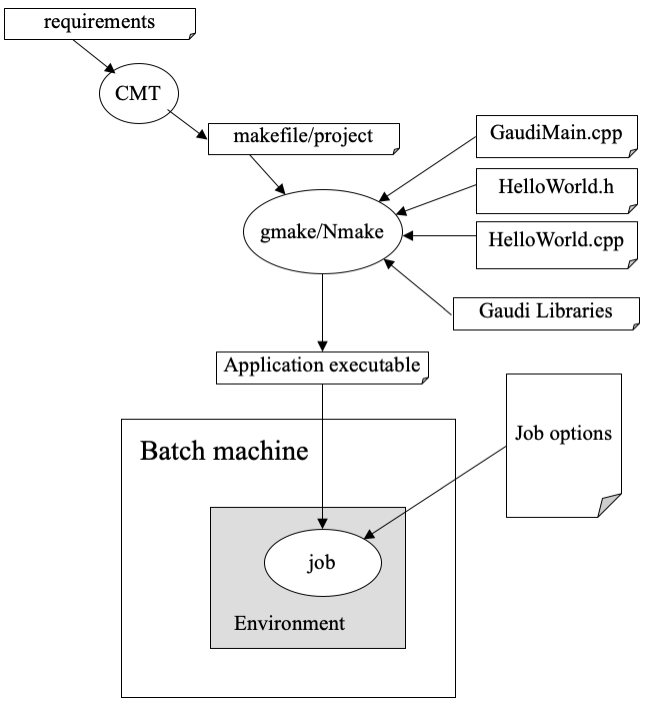
Fig. 5.1 Creating a job from the AlgSequencer example application
The example applications consist of a number of “source code” files which together allow you to generate an executable program. These are:
· The main program.· Header and implementation files for each of the concrete algorithm classes.· A CMT requirements file.· The set of Gaudi libraries.In order for the job to run as desired you must provide the correct configuration information for the executable. This is done via entries in the job options file.
5.3. The main program
The main program is needed to bootstrap the job. It can be completely general, and can be reused by all Gaudi applications. An example main program, from the package GaudiExamples, is shown in Listing 5.1.
It is constructed as follows:
IncludeThese are needed for the creation of the application manager and Smart interface pointers.Application Manager instantiationLine 12 instantiates an ApplicationMgr object. The application manager is essentially the job controller. It is responsible for creating and correctly initialising all of the services and algorithms required, for looping over the input data events and executing the algorithms specified in the job options file, and for terminating the job cleanly.Retrieval of Interface pointersThe code on lines 14 and 15 retrieves the pointers to the IProperty and IAppMgrUI interfaces of the application manager.Setting the application manager’s propertiesThe only property which needs to be set explicitly in the main program is the name of the job options file which contains all of the other configuration information needed to run the job. In this example, the name is the first argument of the program and defaults to “../options/job.opts” (line 23); it is set on line 25.Program executionAll of the code before line 28 is essentially for setting up the job. Once this is done, a call to appMgr::run() is all that is needed to start the job proper! The steps that occur within this method are discussed briefly in section Section 5.7.
5.4. Configuring the job
The application framework makes use of a job options file for job configuration. Part of the job options file of an example application is shown in Listing 5.2.
The format of an options file is discussed fully in Chapter 11. Options may be set both for algorithms and services and the list of available options for standard components is given in Section 20. Here we look briefly at a few of the more commonly used options.
5.4.1. Defining the algorithms to be executed
The option ApplicationMgr.TopAlg (line 7) is a list of algorithms that will be created and controlled directly by the application manager, the so-called top-level algorithms. The syntax is a list of the form:
ApplicationMgr.TopAlg = { "Type1/Name1", "Type2/Name2" };The line above instructs the application manager to create two top level algorithms. One of type Type1 called “Name1” and one of type Type2 called “Name2”.
In the case where the name of the algorithm is the same as the algorithm’s type (i.e. class), only the class name is necessary. In the example, an instance of the class “ReadAlg” will be created with name “ReadAlg”.
5.4.2. Defining the job input
Event data input is controlled by an EventSelector. The EventSelector uses a storage technology dependent data persistency service to load the data into the transient event data store, with the help of converters which are able to convert the data from the technology dependent persistent representation, to the technology independent representation in the transient data store.
In order to set up this mechanism, one needs a number of job options:
- Line 14 defines the input data file, and the persistency technology (ROOT I/O in this example).- Line 6 tells the application manager to create a new event conversion service, to be called RootEvtCnvSvc. Note that this is just a name for our convenience, the service is of type DbEventCnvSvc and does not (yet) know that it will deal with ROOT technology. The configuration of RootEvtCnvSvc to use the ROOT I/O technology is done in line 22.- Line 19 tells the event persistency service (EventPersistencySvc created by the application manager by default) to use the RootEvtCnvSvc to do the conversion between persistent and transient data representations.- Line 5 tells the application manager which additional libraries to load in order to find the required conversion service. In this example, the GaudiDb library contains the DbEventCnvSvc class, the GaudiRootDb library contains the ROOT specific database drivers.- Finally, the options on lines 15 and 16 tell the EventSelector to start reading sequentially from the first event in the file, for five events.In the special case where no event input is required (e.g. for event generation), one can replace the above options by the two options:
ApplicationMgr.EvtMax = 20; // events to be processed (default is 10)
ApplicationMgr.EvtSel = "NONE"; // do not use any event input
A discussion of event I/O can be found in Section 11. Converters and the conversion process are described in Section 14.
5.4.3. Defining job output
One can consider three types of job output: event data (including event collections and n-tuples), statistical data (histograms) and printout. Here we discuss only the simplest (printout); histograms are discussed in Section 10, event data in Section 7.10.1, event collections in Section 12.3.1.
Printout in Gaudi is handled by the message service (described in Section 12), which allows to control the amount of printout according to severity level. The global threshold for printout is set by the option on line 10 - in this example only messages of severity level WARNING or above will be printed. This can be over-ridden for individual algorithms or services, as in line 11, where the threshold for EventSelector is set to DEBUG.
5.5. Algorithms
The subject of specialising the Algorithm base class to do something useful will be covered in detail in Section 6. Here we will limit ourselves to looking at an example HelloWorld class.
5.5.1. The HelloWorld.h header file
The HelloWorld class definition is shown in Listing 5.3
Note the following:
· The class is derived from the Algorithm base class as must be all specialised algorithm classes. This implies that the Algorithm.h file must be included (line 6).· All derived algorithm classes must provide a constructor with the parameters shown in line 9 . The first parameter is the name of the algorithm and is used amongst other things to locate any options that may have been specified in the job options file.· The HistoAlgorithm class has three (private) data members, defined in lines 18 to 20. These are properties that can be set via the job options file.· The three methods on lines 12 to 14 must be implemented, since they are pure virtual in the base class.
5.6. The HelloWorld implementation file
The implementation file contains the actual code for the constructor and for the methods: initialize(), execute() and finalize(). It also contains two lines of code for the HelloWorld factory, which we will discuss in section Section 6.3.1
The constructormust call the base class constructor, passing on its two arguments. As usual, member variables should be initialised. Here we declare and initialise the member variables that we wish to be set by the job options service. This is done by calling the declareProperty() method.
Looking at the code in the example (Listing 5.4) we see that we are now able to print out the values of the algorithm’s properties, using the message service and the MsgStream utility class. A local MsgStream object is created (line 3 ), which uses the Algorithm’s standard message service via the msgSvc() accessor, and the algorithm’s name via the name() accessor. The use of these is discussed in more detail in Section 12.
Note that the job will stop if the initialize() method of any algorithm does not return StatusCode::SUCCESS. This is to avoid processing with a badly configured application.:
5.7. Job execution
From the main program and the CMT requirements file we can make an executable, as explained in section Section 4.6. This executable together with the file of job options form a job which may be submitted for batch or run interactively. Fig. 5.2 shows a trace of an example program execution. The diagram is not intended to be complete, merely to illustrate a few of the points mentioned earlier in the chapter.
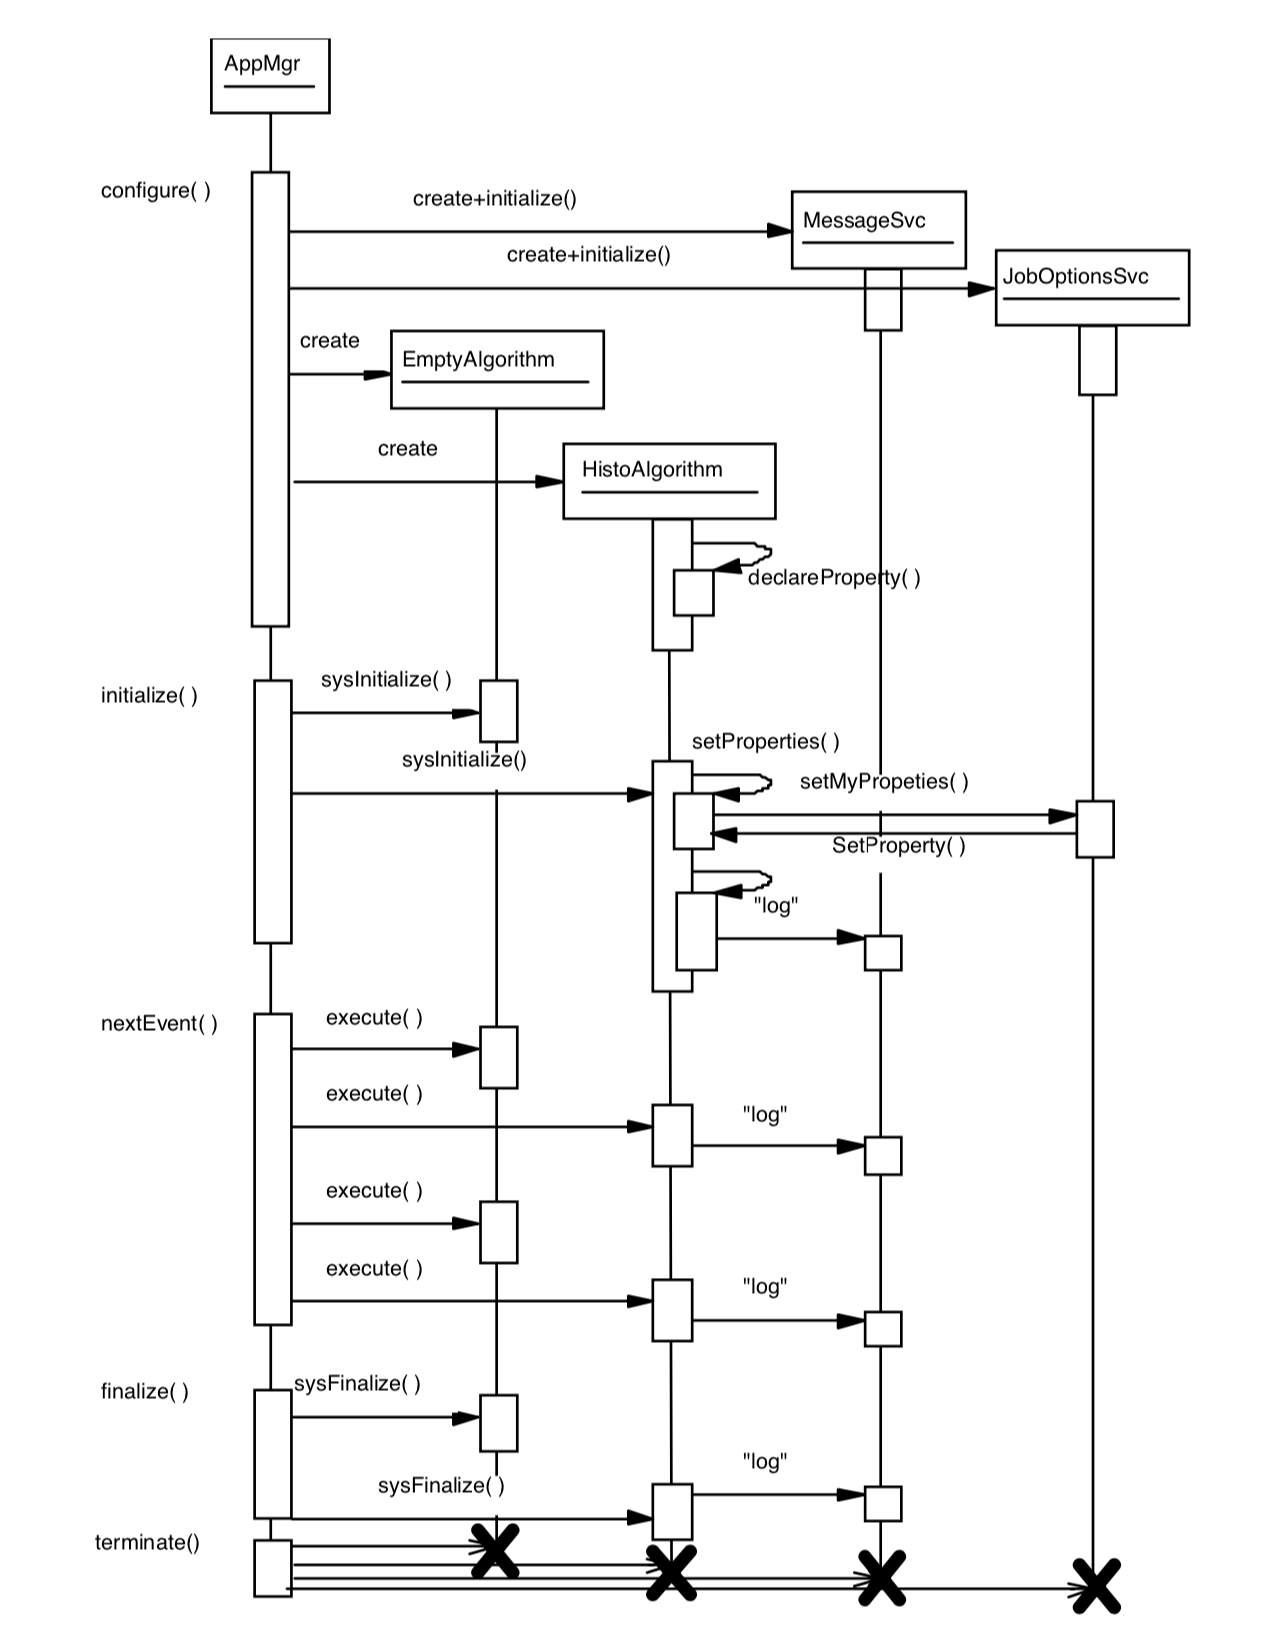
Fig. 5.2 A sequence diagram showing a part of the execution of an example program
1. The application manager instantiates the required services and initialises them. The message service is done first to allow the other services to use it, and the job options service is second so that the other services may be configured at run time.2. The algorithms which have been declared to the application manager within the job options (via the TopAlg option) are created. We denote these algorithms “top-level” as they are the only ones controlled directly by the application manager. For illustration purposes we instantiate an EmptyAlgorithm and a HistoAlgorithm.3. The top-level algorithms are initialised. Their properties (if they have any) are set and they may make use of the message service. If any algorithm fails to initialise, the job is stopped.4. The application manager now starts to loop over events. After each event is read, it executes each of the top level algorithms in order. The order of execution of the algorithms is the order in which they appear in the TopAlg option. This will continue until the required number of events has been processed, unless one or more of the algorithms return a FAILURE status code more than the maximum number of times, in which case the application manager will jump to the finalisation stage before all events have been processed.5. After the required data sample has been read the application manager finalises each top level algorithm.6. Services are finalised.7. All objects are deleted and resources freed. The program terminates.
5.8. Examples distributed with Gaudi
A number of examples is included in the current release of the framework, in the GaudiExamples package. The package has some sub-directories in addition to the standard ones shown in Fig. 17.2. The options sub-directory contains files of standard job options common to many examples. These files are included in the job options of the specific examples when necessary. The specific job options files can be found in the home sub-directory.
The code of the examples is in sub-directories of the src directory, one sub-directory per example. The intention is that each example demonstrates how to make use of some part of the functionality of the framework. The list of available examples is shown in Table 5.1.
Table 5.1 List of examples available in Gaudi release v9¶ Example Name
Target Functionality
AlgSequencer
Illustraing the use of the sequencer algorithm provided with teh GaudiAlg package
AlgTool
Example implementation and use of a Gaudi Tool
Common
Actually not a complete example: contains the main program used in the examples
GPython
Exercise the Python scripting packages
Properties
Trivial algorithm showing how to set and retrieve Properties
RandomNumber
Example of use of the Random Number service
RootIO
Two examples, reading and writing persistend data with ROOT I/O