Field plots are made only over the part of the viewing plane that is located inside the box.
Particles are allowed to drift inside the limits of the box.
[The initial default is taken from the cell dimensions.]
The viewing plane is defined by a formula in terms of the variables X, Y and Z that defines the points located in the plane. The formula should be linear in all 3\ variables. No particular format is required, the formula is not looked at token by token, but evaluated at 9 points to extract the parameters of the plane.
In 3-dimensional field plots, plane oriented commands such as PLOT-FIELD SURFACE, PLOT-FIELD VECTOR and PLOT-FIELD HISTOGRAM, compute the quantities that they plot in points of the viewing plane.
In 2-dimensional chambers, the plane would normally be chosen to coincide with the plane in which the chamber is described, i.e. the plane would be z=0 for a chamber in (x,y), but this is not mandatory. It is perfectly permissible, and it can also be meaningful, to define solids and view them in 3D perspective.
If you plan to issue field plotting commands after the AREA statement, then please ensure that the viewing plane crosses the limiting box of the area - points on the viewing plane, but outside the limiting box are not shown.
For drift plots, the viewing plane merely determines the plane onto which the drift-lines will be projected. Wires, tubes, planes and other materials are plotted as the cross section with the viewing plane.
Examples:
area view x+2*y+3*z=5
area view y=z
area view y=0 rotate 90
[The default setting is Z=0.]
Additional information on:
This angle must not be specified with the X-Y, Y-Z, X-Z and R-PHI projections.
The angle should be given in degrees.
[Default rotation angle: 0\ \°.]
In this kind of view, any solids that may have been entered will not be shown. If the field is derived from a 2D or 3D field map, then the elements or the cross sections of the elements will be shown if the PLOT-MAP option is active.
This type of plot consists of
[This is the initial default for Cartesian cells and cells that have a tube, provided no VIEW is specified.]
In this kind of view, any solids that may have been entered will not be shown. If the field is derived from a 3D field map, then the cross sections of the elements of the field map will be shown if the PLOT-MAP option is active.
Beware that the coordinate system used for this view is left-handed. Trajectories of particles in a magnetic field will therefore appear to bend counter-naturally. To obtain a right-handed view of the same plane, use VIEW y=0 and request a CUT projection, optionally specifying a rotation angle.
This type of plot consists of
[X-Y is default]
In this kind of view, any solids that may have been entered will not be shown. If the field is derived from a 3D field map, then the cross sections of the elements of the field map will be shown if the PLOT-MAP option is active.
This type of plot consists of
[X-Y is default]
In this kind of view, any solids that may have been entered will not be shown, nor will cross sections of the elements of the field map appear.
This type of plot consists of
[This is the default in polar cells.]
The display will show the solids through which the viewing plane cuts, but will not show solids that are located fully above or below the viewing plane.
If displaying the solids is not desired, then the faster X-Y, X-Z or Y-Z options should be used. If on the other hand solids should be shown, then the 3D option might be preferable.
If the PLOT-MAP option is on and if the field is derived from a field map, then the elements or the cross sections of the elements with the viewing plane will be shown.
This projection, other than 3D, will usually lead to a view that is not isometric.
This type of plot consists of
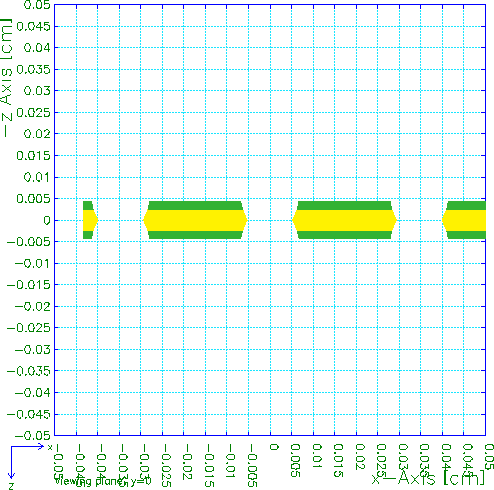
A cut through the same GEM foil that illustrates the 3D view. Outlining is absent in this example.
[CUT becomes the default if a viewing plane is defined in the same AREA statement, unless 3D was set previously.]
The various solids present in the cell are coloured in shades of their basic colour, depending on the exposure with respect to the light source and the viewing plane, on the REFLECTED-FRACTION and on the ABSORBED-FRACTION of the light. The various shades of each colour can be examined with the SHADING-MAP graphics command.
Elements of the field map are not shown with this projection, even if the PLOT-MAP option is on.
This is the only projection that guarantees an isometric projection.
This option is highly CPU intensive and makes use of a much large number of colours than usual.
The plots consist of the following elements:
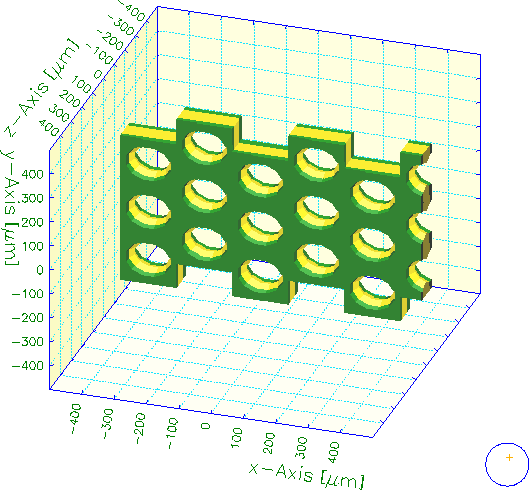
A three dimensional view of a GEM foil with staggered holes.
In this view, the outside of the solids is shown in the same colour shades as in the 3D view, while the inside is shown with colour 8, usually red. The inside should only be visible if:
This option is valid only when neBEM is used to calculate the field.
[Intended for debugging purposes.]
A panel can become visible in two ways:
Reflected light is assumed to be best visible when the normal vector of the panel is nearly equal to half the sum of the viewing direction and the light direction. A tolerance of 18\° (1\ \σ) is applied.
A surface illuminated by scattering is assumed visible if its normal vector and the viewing direction are less than 90\° apart. Diffusely scattered light is assumed to be fully random in direction. Surfaces on which the light falls with nearly normal incidence, are illuminated more (a Gaussian weighting with a 60\°\ \σ is assumed).
Garfield does not perform ray tracing - light reflected from one panel does not contribute to the illumination of another.
The shade used for a surface panel is therefore determined by the following factors:
Parts of panels that are hidden behind others are removed, see SPLIT-INTERSECTING-PLANES.
The light source is assumed to produce a broad beam of parallel light rays, similar to the sun - but unlike a light bulb in the immediate neighbourhood.
The location is expressed in polar angles \φ and \θ, both in degrees.
[Default is 30\° for \θ and \φ.]
Expressed as a percentage.
[Default: 10\ %]
Expressed as a percentage.
[Default: 3\ %]
The shades can be examined with the SHADING-MAP graphics instructions.
[Default: 10]
[By default, only the coordinate axes on the periphery of these 3 panels are shown so as to avoid ending up with an overcrowded plot, but you can obtain the 3 remaining axes by specifying the FULL-BOX-TICKMARKS option.]
On request, by specifying FULL-PLANES, the planes seen from the back will be shown fully,
This option is meaningful only with 3D impressions.
On request, by specifying FULL-TUBE, the parts seen from the back will be shown fully,
This option is meaningful only with 3D impressions.
Unfortunately, plots made with this option switched off are rarely acceptable. In rare cases, an reasonable result can be obtained with the SORT-PLANES option.
The cutting procedure is complex and presumably still contains errors. Please contact the author in case of poor results and warnings from the PLASPL procedure.
[This option is meaningful only with 3D impressions, where the option is on by default.]
A panel that is partially hidden by another panel will be plotted first. There is however no order relation for hiding: if A hides part of B, and B hides part of C, then C can very well hide part of A. Hence, only very simple cases can be treated with this option.
The main use of this option is to remedy cases where the SPLIT-INTERSECTING-PLANES procedure fails partially.
[The option is off by default.]
Meaningful with 3D plots. Can also be used with CUT plots although, in this kind of diagram, the outer lines of the solids and the borders of the cut through the solids do not as a rule match.
The lines are drawn according to the OUTLINE representation.
[Outlines are by default not drawn.]
The option has effect only if material properties have been entered, either as a map of dielectric constants or as maps of both D and E.
The materials are distinguished by their dielectric constant, which must therefore have been entered with the FIELD-MAP command. This can be done with an explicit map of dielectric constants, but also by a comparison of maps of E and D.
The material with the smallest dielectric constant is shown with representation MATERIAL-1. The medium with the next highest dielectric constant with MATERIAL-2 etc. The drift medium is never shown.
Elements of a 2D field map are only shown in X-Y views and in CUT views at a constant z. The cross sections of the viewing plane with the elements of a 3D field map are shown in X-Y, X-Z, Y-Z and CUT views, but not in 3D views.
Field maps do not usually cover areas filled with conducting material since there is no field inside these. To visualise these, one has to enter them manually with the SOLIDS command. SOLIDS doesn't interfere with PLOT-MAP.
This option can also be switched on or off with the PLOT-MAP option of the FIELD-MAP command.
[This option is by default on if the dielectric constants are known.]
Only active in 3D views.
This is a debugging option.
[This option is switched off initially.]
Formatted on 21/01/18 at 16:55.